How to conquer the matting issue in long haired dogs
How do mats happen? What can we do to prevent them? And how to we get them out?
Left in its natural state, the hair in our dog’s coat gets little tangles just from normal, daily activity. Just rolling and rooting around leads to tangles!
Scratching also creates tangles. For health reasons, the cause of chronic itching and scratching needs to be identified and solved. Another huge benefit of eliminating the need to scratch will be fewer tangles!
Another tangle maker is doggie clothing. Whether the doggie “duds” are worn for fun (cute outfits),or function (coats and sweaters), a quick brush job is in order after “undressing” our furry pals. This will eliminate tangles created as the hair rubbed against the clothing.
Unless these little tangles are brushed out, they get snarled together. Dead, shedding hair gets added to the snarls, making them bigger and thicker.
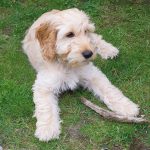
Dead, shedding hair is an issue for all long haired breeds. However, it is much more of an issue for the breeds with under-coats. Some breeds such as the Bichon Frise, the Bolognese, and the Havenese are double coated; that is these three Bichon breeds have both a top coat and an under-coat. By contrast, the Coton de Tulears, Lowchens, and Maltese are single coated breeds, because they have no under-coat.
To re-cap: regular brushing is important for preventing matting for a couple of reasons. It eliminates tangles. It also gets rid of the dead, shedding hair that adds to the snarls.
Without routine grooming tangles grow into mats. Mats are simply dense clusters of snarls and dead hair.
So while simple combing and brushing can prevent mats, these procedures are not effective for getting rid of mats.
Unfortunately wetting mats with water tighens them. So washing your little dog before getting rid of the mats first, only make things worse. This also applies to tangles; if they aren’t brushed out first, bathing makes them bigger and tighter.
Severe matting has additional problems. As hair farther from the original tangle becomes part of the mat, the skin underneath can be pulled. This can be extremely painful! Skin irritations and even ulcerated skin can result from the constant pulling.
Mats are most likely to form in these areas: behind the ears, under the collar, underneath the front legs (the “armpit area”), in the groin area, between the hind legs, and on the backs of the hind legs. Routine grooming should always include attention to these areas, with the best plan being to get small tangles out before they grow into mats.
Unfortunately, there are no “magic” formulas for eliminating well-developed mats. For heavily matted conditions that involve mats larger than an adult thumb, it’s probably advisable to consult a professional groomer.
The good news is that there are some “tricks” for working on mats that can help one make the most of the time while minimizing discomfort and the hair loss for your little buddy.
Now that we know how mats develop, where they are most likely to crop up, and how to prevent them we’ll learn some of the “tricks” for conquering them.
We’ll start with the simplest of these “tricks” that involve a minimum of special grooming tools: a slicker brush, a metal comb, and your fingers.
First mentally note where the mats are. Choose and work with a small area at a time. It can be helpful to have some tiny treats on hand to occasionally reward your little one for accepting this grooming situation.
Keep de-matting sessions short. Give your little pal frequent breaks to play and have some fun with you. It’s better to have several 10-minute sessions than work for a solid hour.
To begin the “mat attach,” gently brush around the mat to get loose, dead hair out of the coat. “Slicker brushes” work well for this as they are designed to be easy on the coat while helping to remove tangles, dead hair, and excess undercoat. Next, pull the mat apart with your fingers. This process helps to loosen the matted hair. This pulling action should be from the center of the mat outwards so that your hands pull from the opposite directions. Take care not to do any pulling away from your little buddy’s body as this would be quite painful. After pulling the mat in opposite directions with from the left and from the right, change your pulling angle. Now pull the mat in opposite directions from above and below. Again, remember not to pull any hair away from the body because this would hurt! Often mats can be pulled a part several times just by working at them with your fingers. The smaller that they can be divided, the more effective a metal comb and slicker brush are likely to be. After separating the mat as much as possible with our fingers, use a metal comb. With one hand, hold the mat very close to your little buddy’s skin to prevent painful pulling. Start by gently combing very close to the outer end of the mat. If combing successfully works to untangle the end of the mat, very gradually comb closer and closer to the body. Another word of caution: combing depth should also be done progressively. Avoid trying to comb through the entire thickness of the mat at once. That kind of pulling translates into major pain! Instead, work with a light touch. Follow-up combing with gentle strokes of the slicker brush. It may be necessary to recycle through this 3 step process again if the mat smaller, but still not gone. In summary, there is a simple sequence for successfully conquering basic mats:
*Pull the mat a part in opposite directions with your fingers to make it smaller and more manageable. *Hold the mat next to the skin with one hand and work on the mat with a metal comb, using your other hand. *Brush the hair gently with a slicker brush. So far we’ve covered how mats develop, how to prevent them, and how to “conquer” simple mats. Many thicker mats require more than just your fingers, a metal comb, and a slicker brush. There are several tools that are helpful when tackling these bigger, more stubborn mats. Here we’ll explain these “mat cracking” tools. Although they are designed to get at the root of the problem, remember to always begin by brushing around these tougher mats. This will get out any loose, dead hair that can complicate the task. Mat rakes, or mat combs, have a row of widely spaced “teeth.” These “teeth” are actually razor sharp stainless steel blades. They have blunted safety tips on the ends of each blade. Mat rakes are designed to slowly “saw” through each mat. The recommended technique is to start working at the outer end of the mat. (This is the end farthest from the skin). Then, working with a light touch, gradually use the mat rake closer to the inner part of the mat (nearer the body of the dog).
After using a mat rake or mat comb on the most superficial level of the mat, brush gently to get rid of any loose or dead hair. Next, pull the mat in opposite directions with your fingers again to see if can be worked a part manually.
Repeat this process, but little by little, work a little deeper into the mat with the mat rake or mat comb. Each time one slices through a layer of hair in the mat, follow up with brushing, and then finger pulling. When using any of these tools, take special care to hold the mat next to the dog’s skin with your opposite hand to prevent painful pulling. Mat splitters are a single-bladed tool designed to gradually slice through mats. Again, precautions must be taken not to pull or poke that tender skin! When using a mat splitter, remember to work from the outer end very gradually in toward the skin. Also work lightly, very gradually slicing deeper into the matted hair, layer by layer. Gently brush the mat after each cut is made. As a few hairs are cut at a time, the mat will hopefully loosen enough to allow some successful brushing and finger pulling. By progressing in this way, the goal is to “finish” the job with no more hair loss than necessary. The coat-king is a multipurpose tool. It has a row of curved, blunted teeth. There are razor-sharp blades between these teeth. While mat-kings are designed for dematting long haired dogs, they are also intended for stripping undercoats. Undercoat stripping is not recommended for dogs of any variety! So care should be taken to use a very light touch with this tool so as not to remove more hair than necessary. Sometimes mats are too large and thick for basic tools to “conquer.” (This is often the case with “rescued dogs). At this point, a professional groomer is needed. Shaving will probably be necessary to get rid of these mats. After shaving, the hair remaining will be very short and lie next to the skin. Grooming is, nevertheless, very important during this time when the hair is growing back. Take a couple of minutes each day to gently stroke your dog all over with a very soft-bristled baby brush. This will accomplish 3 major things. First it will accustom your little pal to painless, brief brushing. Secondly, as the hair grows, it will easily prevent tiny tangles from ever developing into mats. Finally it will help the 2-legged part of this “partnership” get into a habit that will easily prevent mats from ever developing again. Our little buddies depend on us for their well-being and care. We owe it to them to be the best care-givers possible. Hopefully this information on conquering mats will help you and enrich the lives of those little souls in your care.